Easy Origami Butterfly: Step-by-Step Paper Craft
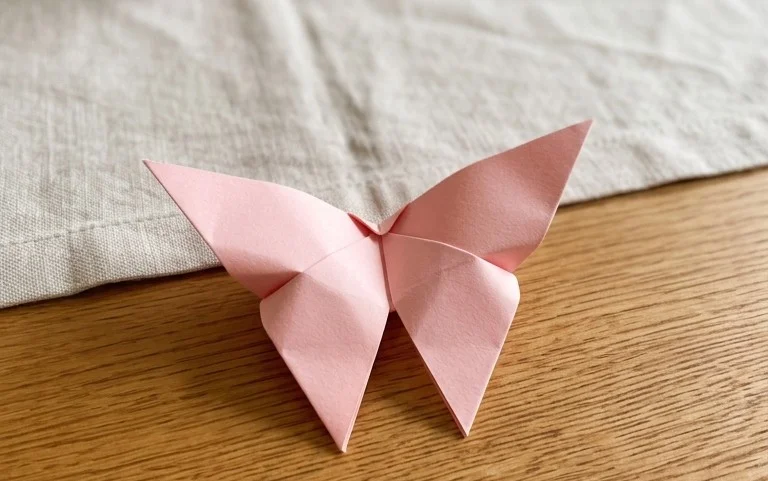
Easy origami butterfly projects are a fantastic way to dive into the wonderful world of paper folding! In this tutorial, I’ll guide you step-by-step to create a beautiful, delicate butterfly with elegant wings that seem ready to flutter away. Imagine a charming little paper creature, perfect for adding a touch of handmade magic to your world.
This design is absolutely perfect for complete beginners, young crafters, or anyone looking for a quick and rewarding activity. It’s also a lovely idea for making handmade gifts or decorations! You’ll be amazed at how quickly, in just about 5-10 minutes, you can transform a simple square of paper into this delightful creation. We’ll cover fundamental folds that are easy to master, setting you up for even more exciting origami adventures. Get your paper ready – let’s fold!
## Easy Origami Butterfly: Simple Instructions for Beginners
Welcome to the wonderful world of origami! Today, we’re going to make a beautiful and surprisingly simple origami butterfly. This is a fantastic project for beginners because it uses only a few basic folds, and the result is truly lovely. It’s the kind of model that will have you feeling like a seasoned origami artist in no time. Let’s get started!
### Choosing Your Paper
The first step in any origami project is selecting the right paper. For this butterfly, you have a few choices, but I recommend keeping it simple as a beginner.
-
Type of Paper:
For this butterfly, standard origami paper is your best bet. It’s designed to hold creases well and is thin enough to fold neatly. If you don’t have specific origami paper, plain printer paper is a decent substitute, though it can be a little stiffer. Avoid cardstock or very thick paper as it will make the folds difficult and the final model chunky.
-
Weight:
Origami paper typically weighs around 70-80 gsm (grams per square meter). This is the ideal weight for this model. Printer paper is often a bit heavier, which is why it can be a little trickier.
-
Size:
A good starting size is a square of 6 inches by 6 inches (15cm x 15cm). This size is manageable for learning the folds. Once you’re comfortable, you can experiment with smaller or larger squares.
-
Single or Double-Sided:
This is where you can have some fun with your butterfly!
- Single-Sided Paper: If your paper has a coloured side and a white side, the coloured side will be the outside of your butterfly’s wings. This creates a lovely two-toned effect, which is very popular.
- Double-Sided Paper: If you have paper that is coloured on both sides, your butterfly will be vibrantly coloured all over. This also looks fantastic!
- Patterned Paper: Origami paper often comes with beautiful patterns. This can create a truly unique and artistic butterfly. Just ensure the pattern isn’t too busy, or it might get lost in the folds.
### The Base Folds: Building Blocks for Your Butterfly
Before we dive into the butterfly itself, let’s get familiar with two fundamental origami folds that we’ll be using: the valley fold and the mountain fold.
A valley fold is when you bring two edges together and the crease forms a “valley” or “V” shape in the paper. You’re essentially folding the paper towards you.
A mountain fold is the opposite. You’re pushing the paper away from you, and the crease forms a peak or an inverted “V” shape. Often, a mountain fold is made by reversing an existing valley fold.
For this butterfly, we’ll primarily be using valley folds to start, and then some mountain folds to shape the wings.
### The Folding Sequence: Step-by-Step Butterfly Creation
Let’s get folding! Take your square piece of paper. If you have single-sided paper, start with the white side facing up.
-
Step 1: Diagonal Fold
Take the bottom right corner of your square and bring it up to meet the top left corner. Make a sharp crease along the edge where the two corners met. You should now have a triangle. Unfold the paper.
-
Step 2: Second Diagonal Fold
Now, take the bottom left corner of your square and bring it up to meet the top right corner. Crease sharply. You should now have a triangle again, and when you unfold it, you’ll have an “X” crease pattern on your square. Unfold.
-
Step 3: Horizontal Fold
Turn your square so it looks like a diamond (a corner pointing up, down, left, and right). Take the bottom corner and bring it up to meet the top corner. Crease firmly. Unfold.
-
Step 4: Vertical Fold
Turn your paper back so it’s a square again, with the corners pointing up, down, left, and right. Take the left corner and bring it over to meet the right corner. Crease firmly. Unfold. Now you have a square with an “X” and a “+” crease pattern.
-
Step 5: Squash Fold Base (The Magic Happens!)
This is where it gets a little more interesting, but don’t worry, we’ll go slowly. With your paper still creased like a plus sign and an X, carefully push the left and right sides inwards. The top point should naturally come down to meet the bottom point. As you push the sides in, the paper should collapse into a smaller square. This is called a preliminary base or a square base. Ensure all your edges are aligned and the creases are sharp. You should now have a smaller square with two flaps on the left and two flaps on the right. The open edges should be at the bottom, and the folded point should be at the top.
-
Step 6: Prepare the Wings
With the open edges of your square base facing down, take the top flap on the right side and fold its bottom edge up so it aligns with the centre vertical crease. Make a sharp crease. Repeat this on the left side, taking the top flap on the left and folding its bottom edge up to meet the centre vertical crease. You should now have a kite shape on the top layer.
-
Step 7: Flip and Repeat
Turn the entire model over. You’ll see the back of your kite shape. Now, take the top flap on the right and fold its bottom edge up to align with the centre vertical crease. Crease sharply. Do the same for the top flap on the left, folding its bottom edge to meet the centre vertical crease. You should now have a kite shape on both sides of your model.
-
Step 8: Fold Up the Point
Look at the very top point of your model (the closed point). Take that single point and fold it downwards, over the kite shapes you just made. You want to fold it down so that the tip extends slightly past the bottom horizontal edge of the kite flaps. This fold will help secure the wings later. Crease firmly.
-
Step 9: Flip Again
Turn the model over one more time.
-
Step 10: The Final Fold to Shape the Body
Now, you’ll see the point you folded down in Step 8 sticking out slightly at the bottom. Take this entire bottom point and fold it upwards and over the body of the butterfly. You’re essentially folding it up and over so that the tip of this point now forms the “head” of your butterfly and its tip will poke out slightly at the very top. Crease firmly. This fold locks everything into place and begins to give the butterfly its shape.
-
Step 11: Shape the Wings
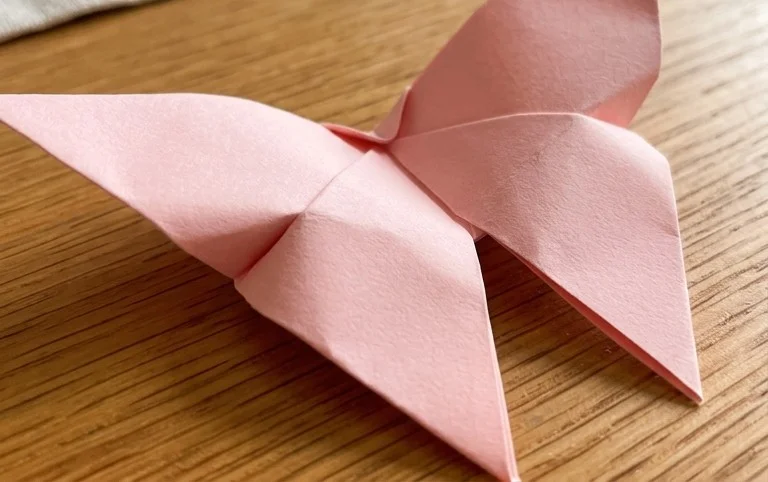
Hold the butterfly by its body (the folded-up point). Gently pull the two wing sections outwards and away from the body. You can crease them slightly where they meet the body to give them a nice angle. You can also gently curve the tips of the wings for a more realistic look. Don’t be afraid to experiment here!
And there you have it! Your very own origami butterfly. Take a moment to admire your work. You’ve just transformed a flat piece of paper into something quite delightful.
### Common Pitfalls and How to Avoid Them
As a beginner, it’s completely normal to encounter a few tricky spots. Here are the two most common places people go wrong with this butterfly and how to avoid them:
-
1. Messy Creases:
The Problem: If your creases aren’t sharp and precise, the paper can buckle and your butterfly might not look as neat. This often happens in the initial base folds (Steps 1-4) and the squash fold (Step 5).
How to Avoid It: Use your fingernail or a bone folder (if you have one) to run along each crease. Make sure the edges you are bringing together are perfectly aligned before you press down. For the squash fold, visualize where the paper wants to collapse. Gently guiding the edges inwards rather than forcing them will help it form a neat square.
-
2. Misaligned Folds in the Kite Shape:
The Problem: In Step 6 and 7, when you fold the bottom edges of the top flaps up to the centre crease, it’s easy to fold them too far or not far enough, resulting in uneven wings or a wonky body.
How to Avoid It: Take your time in these steps. Ensure that the bottom edge of the flap is perfectly aligned with the centre crease. Don’t just guess. Lay the edge flat against the crease and then crease firmly. Doing this on both sides with equal precision is key to symmetrical wings.
### Variations to Spark Your Creativity
Once you’ve mastered the basic butterfly, you can start playing around with different looks!
-
Size:
As mentioned earlier, you can use any size square paper. Smaller paper makes delicate, tiny butterflies perfect for embellishments, while larger paper creates more striking statement pieces.
-
Paper Pattern:
Experiment with different patterned origami papers. Papers with floral designs, geometric patterns, or even subtle textures can give your butterfly a unique personality. Think about how the pattern will look once folded.
-
Colour Combinations:
If you’re using single-sided paper, try different colour combinations. A brightly coloured wing with a contrasting underside can be very eye-catching. Double-sided paper offers a consistent colour on both sides, giving a bold and unified look.
### Displaying and Gifting Your Origami Butterflies
These little origami butterflies are so versatile! Here are a few ideas for what to do with your creations:
-
Mobile:
String several butterflies together at different lengths to create a beautiful, whimsical mobile. Hang it by a window or over a crib.
-
Garland:
Punch a small hole in the body of each butterfly and thread them onto a string or ribbon to make a lovely garland for a party or to decorate a room.
-
Gift Topper:
Attach a butterfly to the top of a wrapped gift instead of a bow. It’s a unique and personal touch that recipients will love.
-
Scrapbooking and Card Making:
These butterflies are perfect for adding a three-dimensional element to handmade cards or scrapbook pages.
-
Mobiles for Plants:
Gently attach a butterfly to a thin wire or a toothpick and stick it into the soil of your houseplants for a touch of unexpected charm.
-
As Gifts Themselves:
Simply placing a few beautifully folded butterflies in a small box or a clear bag makes a thoughtful and charming gift for friends, family, or colleagues.
Folding origami is a relaxing and rewarding hobby. This easy butterfly is a perfect starting point, and I hope you’ve enjoyed making it. Keep practicing, and soon you’ll be creating all sorts of wonderful paper creations! Happy folding!
Conclusion
Congratulations on completing your very first easy origami butterfly! Don’t worry if your initial attempt isn’t perfect; every fold is a step in the learning process, and practice makes for even more beautiful creations. We encourage you to try making another one, perhaps with different colored paper to see how it changes the look of your butterfly.
Once you’re happy with your fluttering friends, why not share them? They make wonderful decorations or thoughtful little gifts! For your next origami adventure, try an origami crane or a simple paper flower.
We hope you enjoyed this project and are inspired to explore many more exciting paper crafts with us!